
Healthy Caramel Apple Dip (Easy 3-Ingredient Recipe)
This Healthy Caramel Apple Dip is made with just 3 simple ingredients and comes together in minutes—no cooking, mixers, or blenders required! Made with any nut or seed butter and naturally sweetened with maple syrup, it’s a more nutritious alternative to traditional caramel, especially when paired with fiber-rich fresh fruit. Serve it with apple slices and a variety of fun toppings for a DIY caramel apple dipping station. Perfect for Halloween parties, holiday gatherings, playdates, or an extra-special after-school snack!
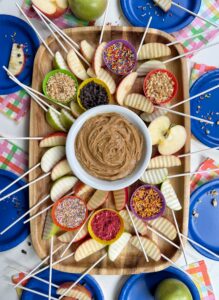
Kids in the Kitchen: How Kids Can Help Make Caramel Apple Dip
This easy caramel dip is a great recipe for kids of all ages to help make! Since there’s no cooking or special equipment required, kids can take the lead on almost every step.
- Measure the ingredients: Let kids scoop and measure the nut/seed butter, maple syrup, and vanilla into a mixing bowl.
- Mix it up: Give kids a spoon or small whisk and let them stir everything together until the dip is smooth and creamy.
- Taste and adjust: Encourage kids to taste the dip and decide if they’d like an extra pinch of salt or a little more vanilla.
- Prepare the apples: Older kids can practice their knife skills by slicing apples with supervision. Younger kids can help arrange pre-cut apple slices on a platter.
- Make apple pops: Let kids carefully insert popsicle sticks into apple wedges or thick slices to make them easier and more fun to dip.
- Create a toppings bar: Kids can help fill small bowls with mini chocolate chips, sprinkles, chopped nuts, crushed freeze-dried strawberries, or any other favorite toppings.
- Build the platter: Encourage kids to get creative arranging the apples, dip, and toppings into a fun, colorful snack board.
- Dip, decorate, and enjoy: Let kids customize their own caramel apple creations by dipping apple slices into the caramel and adding their favorite toppings!
How to Keep Apple Slices from Browning
Want to prep your apples ahead of time without them turning brown? My favorite trick is to soak sliced apples in a simple salt water solution! Unlike lemon juice, which can make apples taste sour, this method helps prevent browning without changing the flavor of the apples. It’s perfect for prepping your caramel apple dipping station ahead of a party or keeping apple slices fresh for snacks and lunch boxes.
- Make the salt water solution: In a large bowl, stir ½ teaspoon of salt into 2 cups of cold water until completely dissolved.
- Soak the apples: Add your sliced apples to the salt water and let them soak for 5 minutes.
- Rinse and dry: Drain the apples in a colander and give them a quick rinse under fresh water to remove any salty taste. Pat dry with a clean kitchen towel or paper towels.
- Store until ready to serve: Place the apple slices in an airtight container and refrigerate for up to 3–5 days, depending on freshness. For the best texture and appearance, I recommend preparing them no more than a day ahead when serving at a party.
Helpful tip: Make sure to dry the apple slices well before dipping them into the caramel. The dip will stick much better to dry apples!
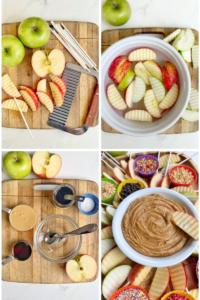
Helpful Substitutions, Tips, and Tools
This healthy caramel apple dip is super easy to customize with ingredients you already have on hand! Here are some helpful tips, simple swaps, and favorite kitchen tools to make preparing and serving this fun snack even easier.
Ingredient Substitutions and Tips
- Swap the nut butter: I love using cashew butter because its mild flavor and creamy texture make the dip taste more like a traditional caramel. However, almond butter is a close second in terms of taste. You can also use peanut butter but the dip will taste more like peanut butter and not like caramel. If you like peanut butter, it will still be good, but just different. Sunflower butter or another nut-free alternative can also be used for a nut-free dip.
- Use a creamy, drippy nut butter: For the smoothest caramel dip, choose a natural nut or seed butter that’s well stirred and easy to mix. If you nut butter is thick you can stir in a little warm water. Stir in 1 teaspoon at a time until the dip reaches your desired consistency.
- Adjust the sweetness: Feel free to add a little more or less maple syrup depending on how sweet you like your dip. Keep in mind that reducing the maple syrup may also change the thickness or consistency of the dip.
- Don’t skip the salt: Just a pinch helps balance the sweetness and gives the dip a more caramel-like flavor. If you’re using salted nut butter, taste before adding extra salt.
- Make it nut-free: Use sunflower seed butter instead of cashew butter for a nut-free version. Be sure to check that your toppings are nut-free too, especially when serving at school or parties.
- Try different dippers: Apples are delicious, but this caramel dip is also great with banana slices, strawberries, pears, pretzels, graham crackers, or even spread on toast!
- Try different toppings: Have kids scour the pantry for fun things to dip into such as sprinkles, cereal, animal crackers, nuts/seeds, and whatever they think will be tasty. See my list of sprinkles and other ingredients HERE.
- Make it ahead: Prepare the caramel dip in advance and store it in an airtight container in the refrigerator. Give it a good stir before serving, adding a splash of water if needed to loosen the consistency.
Helpful Kitchen Tools
- Crinkle cutter: One of my favorite tools for making fruit and veggies more fun! Use a crinkle cutter to give apple slices cute, wavy edges that are especially fun for dipping.
- Lollipop or popsicle sticks: Insert sticks into thick apple slices or wedges to create mini caramel apple pops. They’re easier for kids to hold, dip, and decorate than whole caramel apples.
- Apple slicer or corer: A handy tool for quickly cutting and coring apples, especially when you’re making a big platter for a party.
- Small serving bowls/Silicone muffin liners: Use muffin liners, little bowls, or ramekins to hold sprinkles, mini chocolate chips, chopped nuts, and other fun toppings.
- Large platter or serving board: Arrange the caramel dip, apple slices, and toppings on a large platter or board to create an inviting DIY caramel apple dipping station.
My favorite tip: Let kids choose and arrange the toppings themselves! Giving them ownership over the dipping station makes this simple snack feel like a special activity and encourages them to get creative with their food.
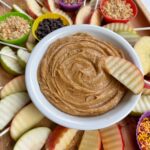
Healthy Caramel Apple Dip
Ingredients
Caramel Dip
- 1/2 cup natural-style cashew or almond butter can use any nut or seed butter, see notes for more options
- 1/4 cup maple syrup
- 1/4 tsp vanilla paste or extract
- 1/8 tsp salt or to taste
Apples and Dipping Platter
- 3 to 4 large apples
- lollipop or popsicle sticks (optional)
- various toppings, such as mini chocolate chips, finely chopped nuts, sprinkles, crushed graham crackers/cookies,...
Instructions
Caramel Dip
- Add the cashew butter (or other nut/seed butter) to a medium bowl.
- Stir in the maple syrup, vanilla, and salt. The mixture will get thicker as you stir. Taste and add more salt or maple syrup as needed.
- Eat with apple slices or other dippers. Store in an airtight container in the refrigerator for 3 days. If dip gets too thick, stir a teaspoon of water at a time until you get the desired thickness.
Apples and Dipping Platter
- Cut apples into 8 to 12 wedges, using an apple corer or a knife. I like to cut the apples into quarters with a knife then cut out the core from each quarter. Then I use a knife or crinkle cutter to cut into smaller wedges.
- If you are serving the apples later or are concerned about them browning, soak the slices in a salt water solution. Full instruction in the blog post.
- You can leave the apple wedges as is or place them on sticks for easy dipping. I find it best to make a small hole with the tip of a knife then insert the stick carefully.
- Place toppings in little bowls or silicone muffin liners. Place those on a platter with apple slices and caramel dip in the center. Enjoy!
Save to Pinterest!